Programming Your V1 Gen2
V1 Gen2 PROGRAMMING
For V1 Gen1 programming, click here.
HOW TO CHANGE V1 Gen2 PROGRAMMING
 WARNING: Important radar alerts may be blocked by changes in factory settings. Features that are Essential To Full Protection are marked with the
 ![]() so change these at your own risk.
so change these at your own risk.
Whenever you alter V1 Gen2’s factory settings you run the risk of inadvertently disabling some aspect of its protection that you really need. Please keep that in mind if you decide to modify its factory programming.
Simple programming changes are possible using only the front-panel controls. Enabling or disabling bands and muting adjustments are typical of changes available with this approach. Our free app enables more subtle alterations. Moreover, the app allows individual settings to be grouped and saved as “profiles” that may be called up later when repeating a specific trip.
The logic of reprogramming is as follows—when you enter the Programming Mode you arrive at a sequence of switches that you step through. Mostly these are on-off switches; you have the option of toggling the switch or skipping over it. When you’ve finished with your adjustments, exit the Programming Mode.
A. How to determine V1 Gen2’s current Operating Mode.
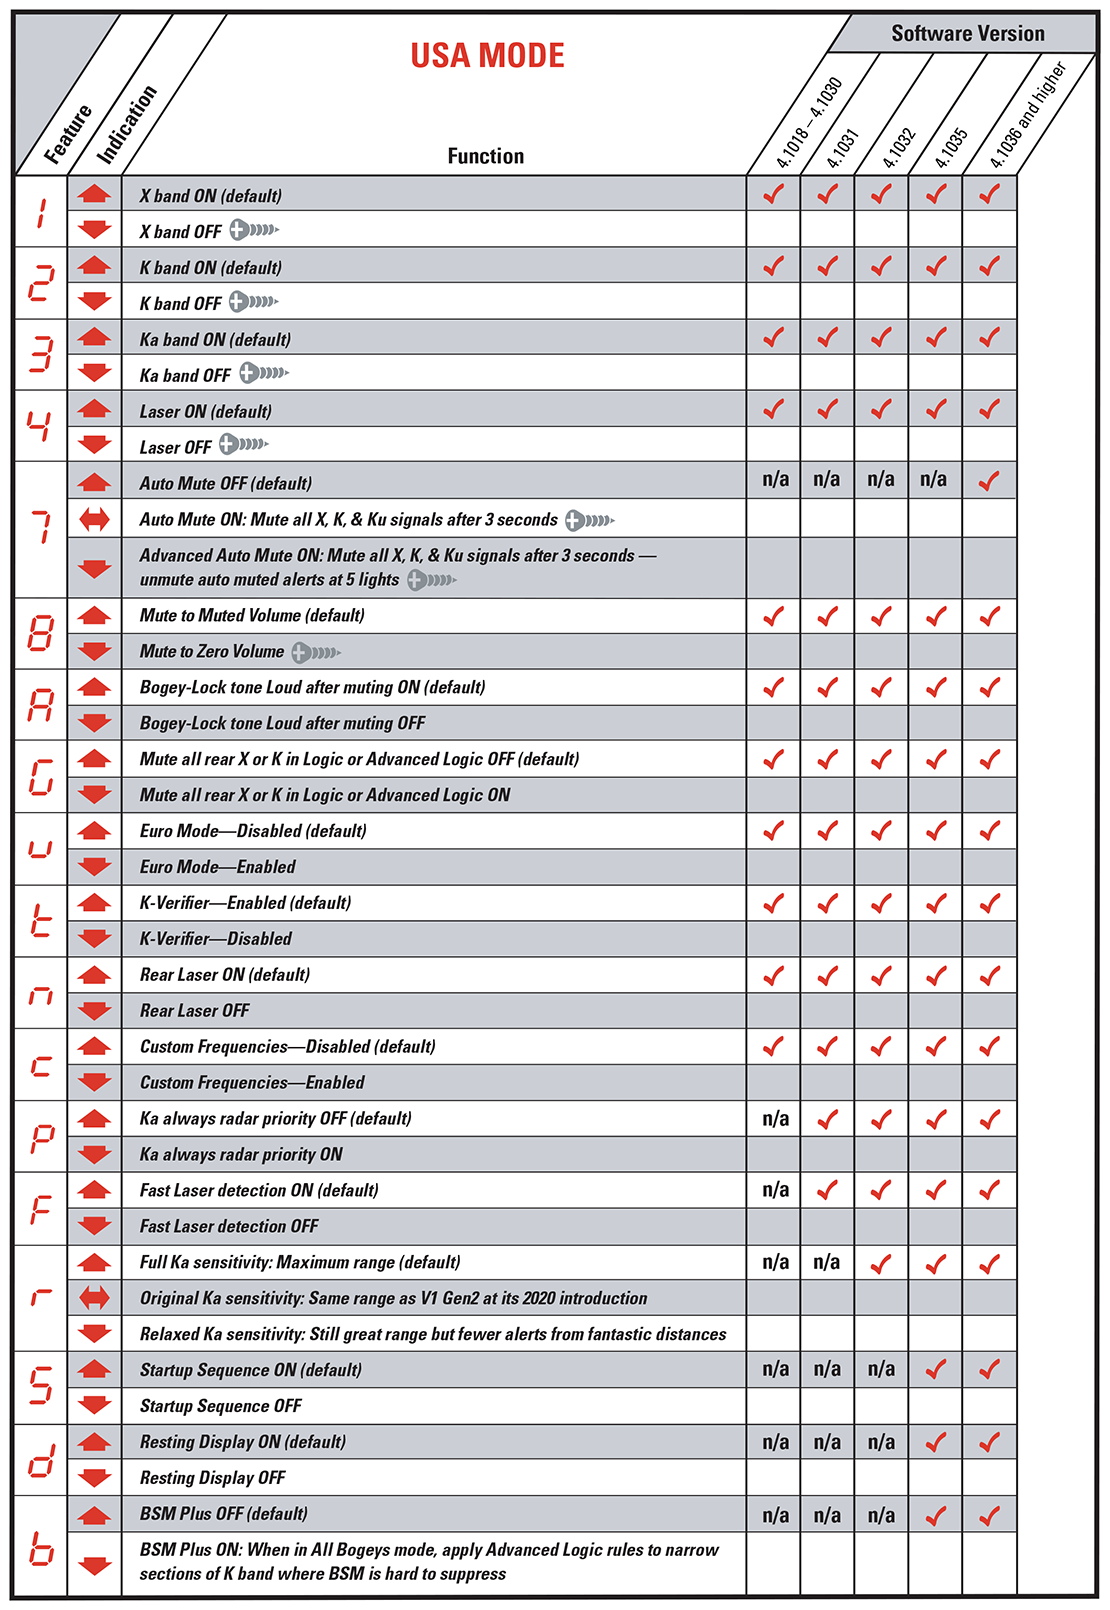
- All V1 Gen2s are shipped from the factory in “USA Mode.” To verify your current status, repeatedly press-and-hold the Control Button for 1.5 seconds to cycle through the Analyzer Modes. If you see “A,” “small L,” “cap L,” click here for the USA Mode programming chart. If you see “U,” then “small U,” click here for the Euro Mode programming chart.
B. How to enter the Programming Mode.
- Starting with power on, press-and-hold both Volume + and Volume – until all front-panel lights are on (takes about 5 seconds).
C. How to determine your software version.
- Press and immediately release the Volume + button. The software-version number is five digits that display one digit at a time in the Bogey Counter—example: 4.1xxx.
- Note your software number, then see the table below for features that are programmable in your unit.
- Press and immediately release the Volume + button to exit software-version display.
D. How to tell if V1 Gen2 has been changed from factory settings.
- During the display of the software version, observe the direction of the arrow in the display: arrow up indicates factory default; arrow down indicates a change from factory default.
- Press and immediately release the Volume + button to exit software-version display.
E. How to program your desired features.
- The switchable Feature is indicated by a character in the “Bogey Counter.”
- To select the next Feature in the sequence, press Volume +; to select the previous Feature press Volume -.
- The Feature State is indicated by direction arrows on the Radar Locator.
- The Feature State is changed by pressing and holding the Control Button until the arrow switches to the opposite direction (takes about 3 seconds). How to reinstate Factory Default settings.
- During the display of the software version, if the arrow is pointed down, press-and-hold the Control Button until the arrow points up.
G. How to exit the Programming Mode.
- Press-and-hold both Volume + and Volume – until the unit restarts. The changes you programmed will be retained in memory.
PDF MANUALS
For complete instructions to reprogram the New V1 Gen2 Radar Detector, download this PDF.
PROGRAMMING CHARTS


